3 Chinese New Years Crafts
This year, the Chinese New Year falls on January 31st, and my horse-obsessed daughter will be happy to know that 2014 will be the Year of the Horse. Here are three, easy, bright and festive crafts to help you celebrate one of the most important Chinese holidays.
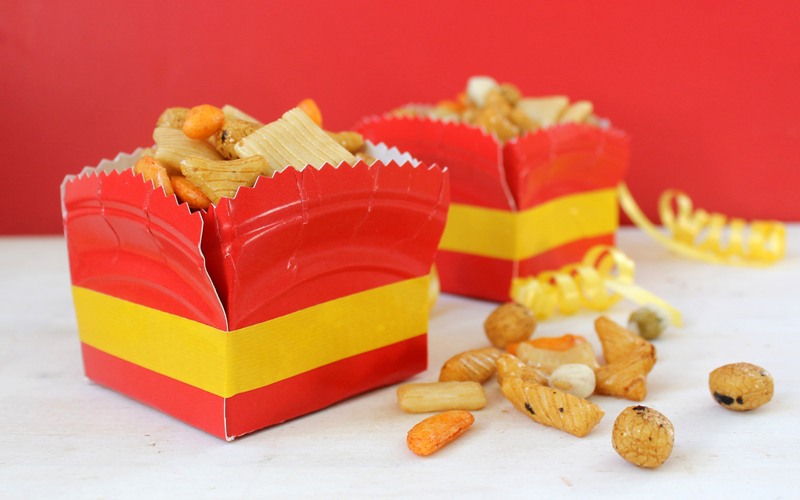
DIY Snack Bowls for Chinese New Year
Turn plain paper plates into cute, little snack bowls for your Chinese New Year party. Fill these with rice crackers, orange slices, sweets, even noodles.
You will need:
Small, red paper plates (about 7-inches in diameter)
Pinking shears or decorative scissors
Pencil
Ruler
Scissors
Paper clips
Decorative tape (found in the craft store)
Trim the edge of each paper plate with the pinking shears.
Turn the plate face down, and use the pencil and ruler to make a grid like the one shown below, with a square centered on the plate. The square shown is 2 ½ inches by 2 ½ inches. Cut every other line from the edge of the plate to the square (do not cut the square).
Fold each of the four sides to make a crease on each edge of the square. Overlap each side and hold closed with four paper clips.
Wrap the decorative tape around the plate to secure, and remove the paper clips. Fill with your favorite treats or snacks.
Cereal Box Horse Puppet
While this DIY cereal box puppet honors the upcoming Year of the Horse, horse fans might like to make these simple puppets any time, any year.
You will need:*
Cereal box
Template for horse
Pencil
Scissors
Paint brush
Brown Paint
Black marker
Glue
Brown yarn
Sticker gems (optional)
Hole punch
Ribbon
Wood or plastic ruler
Brown tissue or construction paper
Tape
*Find the above items at the craft store.
Print out this template HERE on letter-size paper. Cut out the horse portrait and trace on two pieces of a cereal box.
Paint one side of a cereal box horse brown. Flip the second cereal box horse over and paint the reverse side brown. Let both dry completely.
When the paint is dry, use the black marker and the template as a guide to draw the nose, mouth and eye on each horse. If desired, use gem stickers to adorn each horse.
Cut pieces of brown yarn about 3 inches long (or more for a longer mane). Place one side of the horse paint side down. Outline the entire horse edge with glue, except for the bottom. Place yarn ends along the head and mane.
Top with the other horse cut-out so the edges line up. Press to seal 30 seconds, and let the glue dry completely.
Wrap the ruler with brown tissue paper, as if wrapping a gift, and secure with tape. Slide the wrapped ruler into the horse at the bottom. Punch holes at either side of the ruler at the horse’s opening. Thread with ribbon and tie tightly.
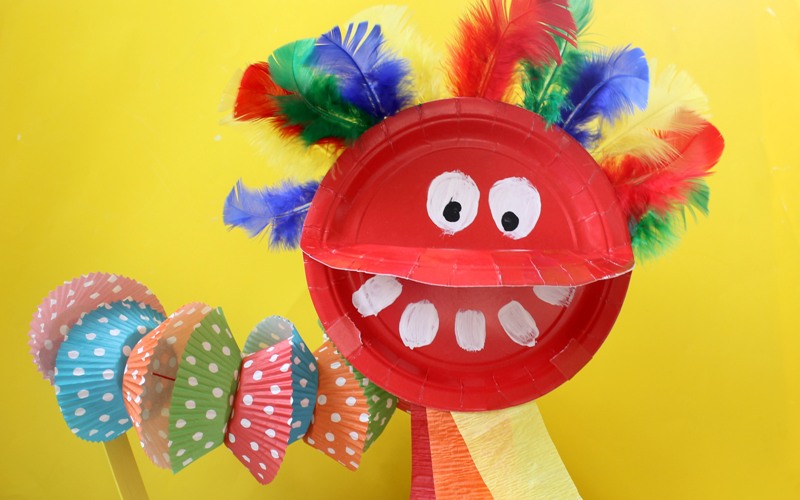
Chinese dragon
Make your own colorful Chinese dragon with paper plates and cupcake liners. Craft sticks let you wiggle and move the dragon through the air. For an extra-impressive and extra long dragon, just keep adding cupcake liners!
You will need:*
3 small, red paper plates (about 7-inches in diameter)
Glue
Plain tape and/or red decorative tape
White paint
Black paint
Paint brush
Crepe paper
Scissors
Feathers
Tapestry needle (supervise younger children if you allow them to use)
Embroidery floss
Colorful cupcake liners
Craft or popsicle sticks
*Find the paper plates in the supermarket. Find the rest of the items at the craft store. Any needle and thread will do, but the embroidery floss is a bit thicker and tapestry needles have blunter ends to avoid sharp sticks in fingers.
Fold two paper plates in half, with the red side inside. Glue the plates together, the backside of half of one plate to the backside of half the other plate. TIP: Hold the plates together tightly for 30 seconds to let the glue set before releasing. Let the glue dry.
Paint two larger circles in white on the upper half of the paper plates and paint teeth on the lowest half. Let the paint dry, and add two small black circles of paint to complete the eyes. Let the paint dry.
Cut a few pieces of crepe paper about 6-inches long, and attach them to the lower half of the plate, at the chin, using glue or tape.
Tape feathers around the top edge of the face. Set the head aside.
Take a length of embroidery floss and thread the needle. Sew together about 10 cupcake liners (or as long as you want your dragon, try 20, or 30!), poking the needle through the center of each and alternating the direction of the cupcake liners.
Poke the needle through the center of a paper plate, from the back, cut the floss, tie a knot and secure with tape on the front of the plate.
Wrap the tail end of the floss around a craft stick and secure with tape.
Tape another craft stick to the back of the plate tied to the cupcake liners. Then, secure this plate to the back of the head using glue and/or tape.
Meaghan Mountford, author of Sugarlicious: 50 Cute and Clever Treats for Every Occasion, has been creating crafty sweets for 15 years. She is especially fond of decorating cookies, marshmallows and putting sweets on sticks. See more on her blog, the decorated cookie.


