4 Fun Zoo-Themed Party Crafts for Kids (and 1 for Mom)
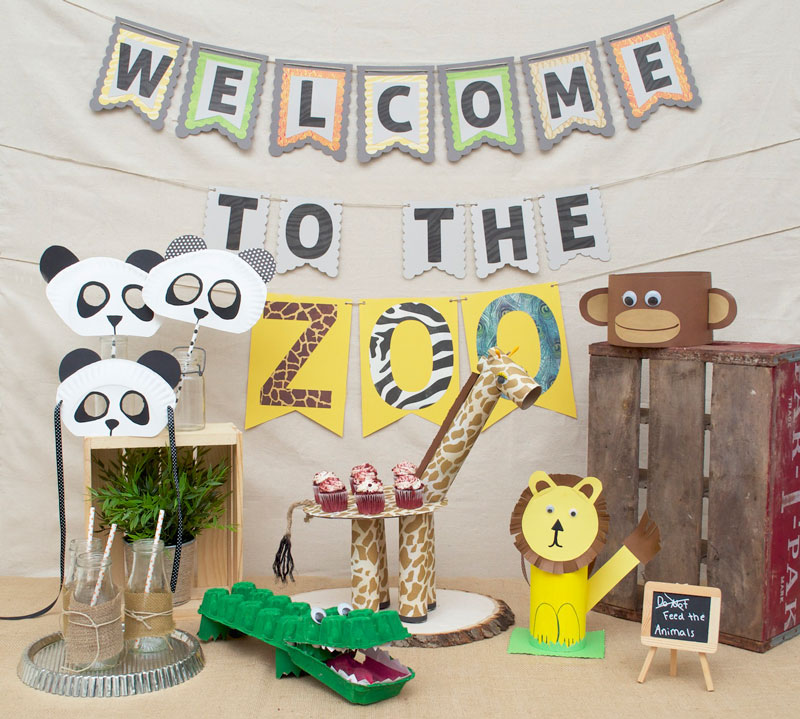
I love a themed party, so when the idea came up for having a ZOO PARTY, I was super excited to get started.
I really wanted to provide great crafts for kids of ALL ages and even one a parent can do!
- Giraffe Cake Stand
- Cereal Box Lion Party Favor
- Paper Plate Panda Mask
- Monkey Hat
- Egg Carton Alligator
There are SO many possibilities for animal crafts when having a Zoo party. I picked out some of my favorite animals (and I hope yours as well)!
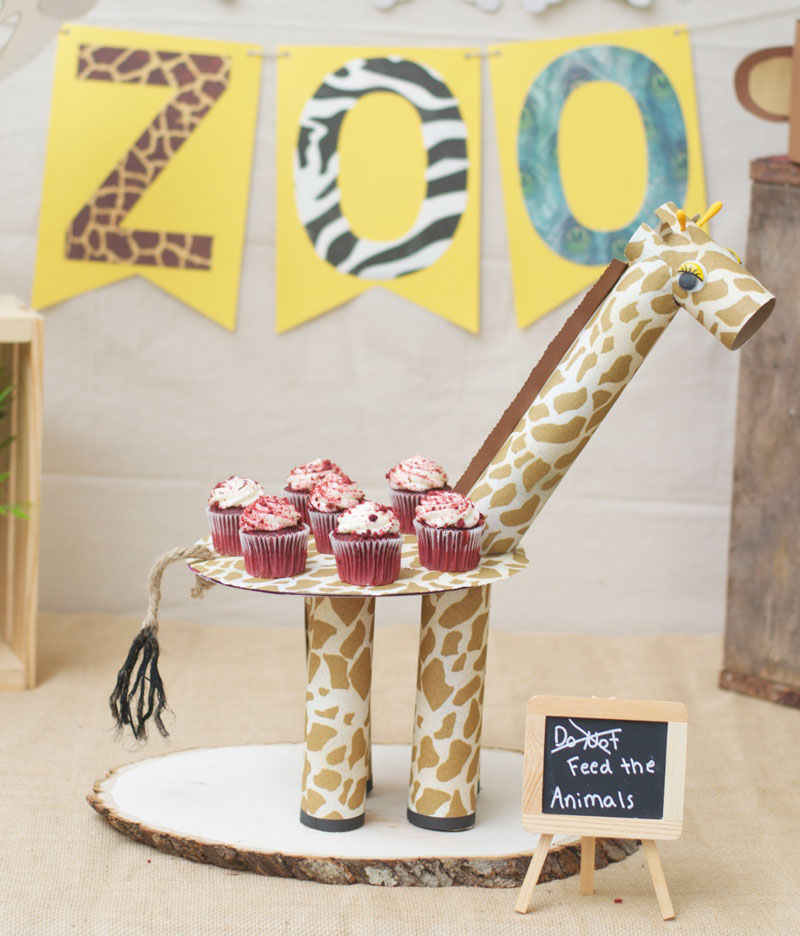
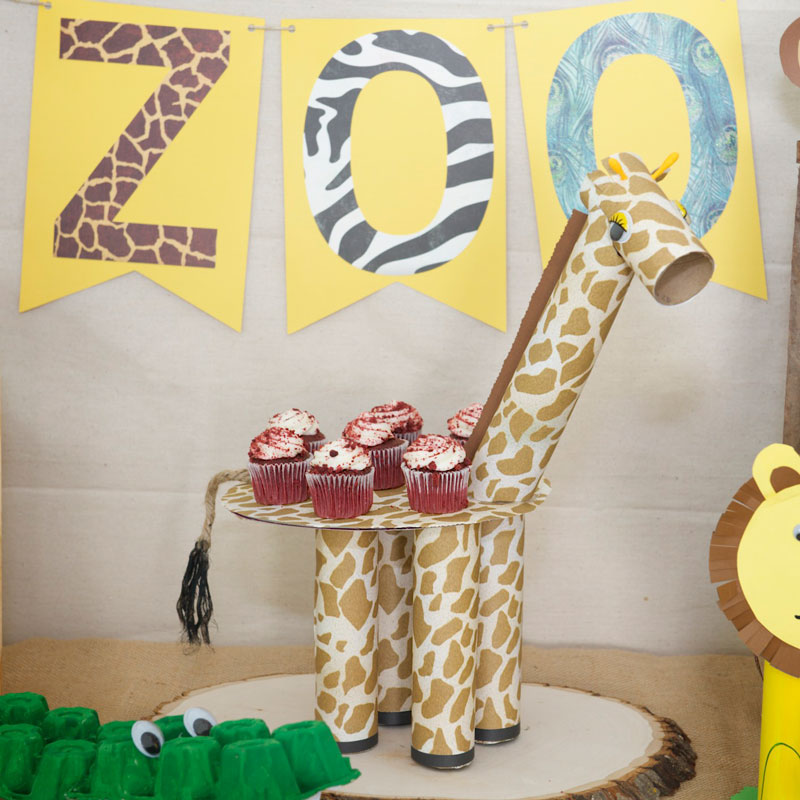
Giraffe Cake Stand
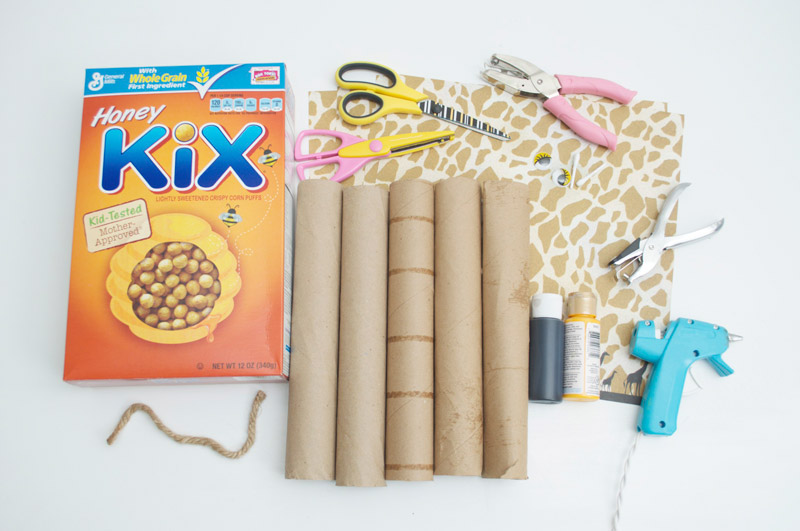
Materials
- Empty cereal box
- Cotton swab
- Giraffe print scrapbook paper
- Googly eyes
- 5 Paper towel rolls
- Black and orange paint
- Rope
- Small and large hole punch
- Scissors (age-appropriate or parental guidance)
- Hot glue (parents only)
Getting Started
For this craft, I had most of the supplies in the house already. I only needed to run out and find the perfect giraffe print scrapbook paper, which I DID!!
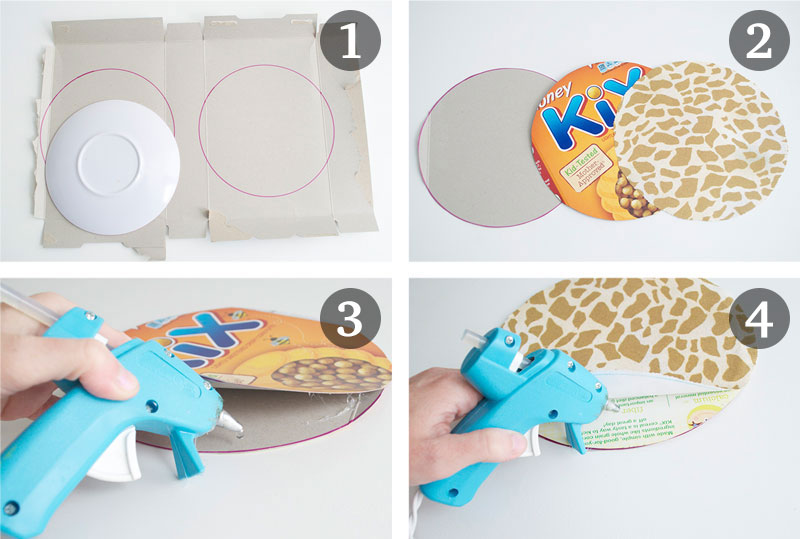
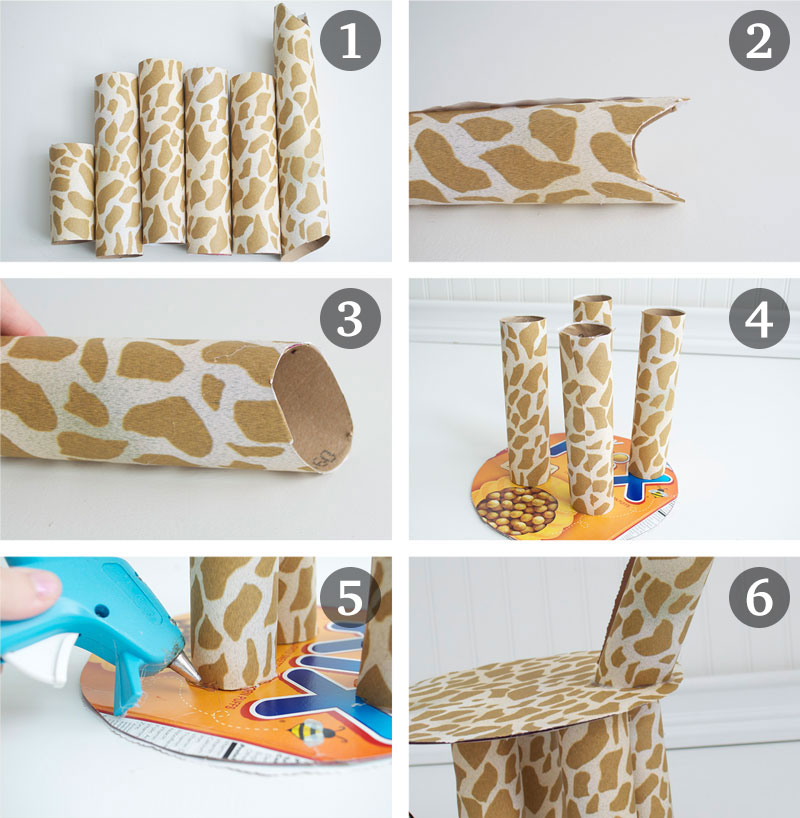
Step 1 – Create Your Cake Stand Tray
I traced out two LARGE circles and then my scrapbook paper with a large plate. I used two cardboard circles so our cake stand will be nice and sturdy.
Then, I used my “Trusty” hot glue gun and glued all my circles together (parents, make sure to do this yourself).
Step 2 – Make and Add Your Legs and Neck
I cut FOUR of the paper towel rolls to roughly 7 inches for the legs and the last one to about 9 inches for the neck. Then, I covered them with scrapbook paper using hot glue.
For the neck, I cut the bottom end at a slant, then I cut out a HALF CIRCLE, so that I could easily add my giraffe’s head.
Finally, I went and hot glued EVERYTHING into place.
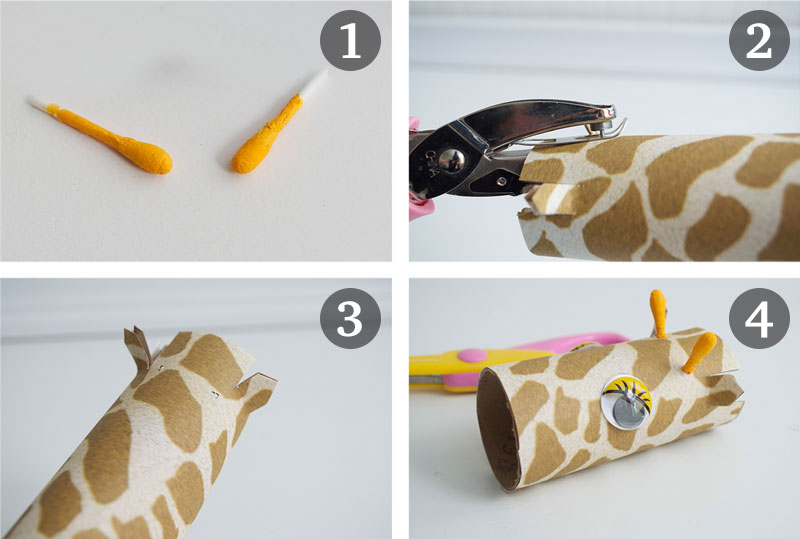
Step 3 – Create and Add Giraffe Face
Cut and paint a cotton swab orange for the giraffe’s horns. Use a small hole punch and gently push in your cotton swabs. For the ears, cut out two strips at the BACK of the head. Fold them up, and cut into a pointed shape.
Finally, I found these GREAT googly eyes (with lashes) and thought they would be perfect for my giraffe, since they have long beautiful lashes. Then, I hot glued my head to the neck of the giraffe.
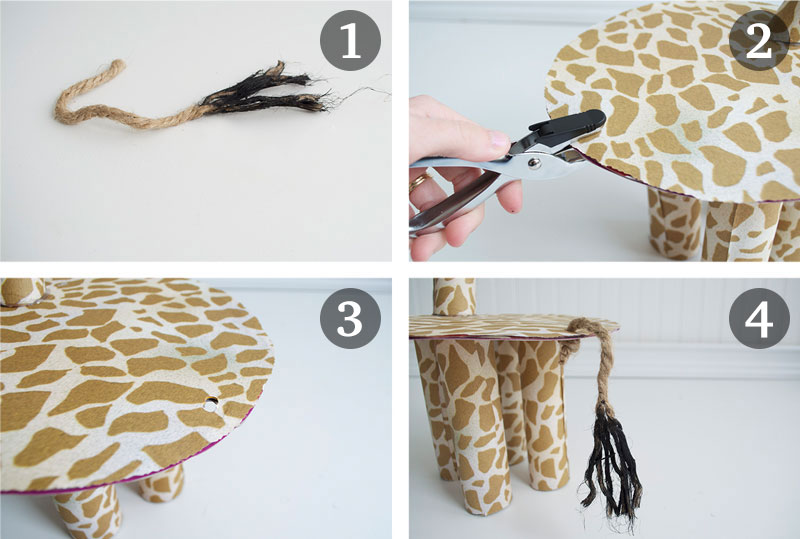
Step 4 – Add Your Tail
I found this rope in my crafting supplies and knew it would work GREAT for our tail. I painted the bottom black and fringed it a little. I used my large hole punch and added my rope and tied a knot at one end.
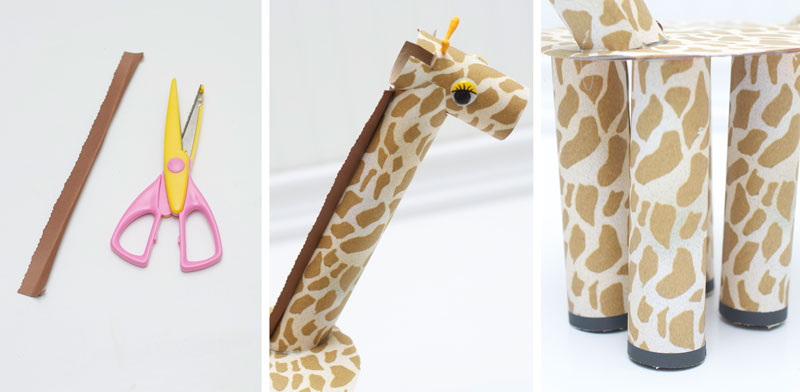
Step 5 – Add Mane and Hooves
After I was done, I decided my giraffe needed a mane and some black HOOVES. I cut a piece of brown cardstock with decorative scissors and hot glued my mane to the back of the neck.
Then, I cut 4 thin strips of black cardstock and wrapped them around the BOTTOM of the legs…done!
Finished Giraffe Cake Stand
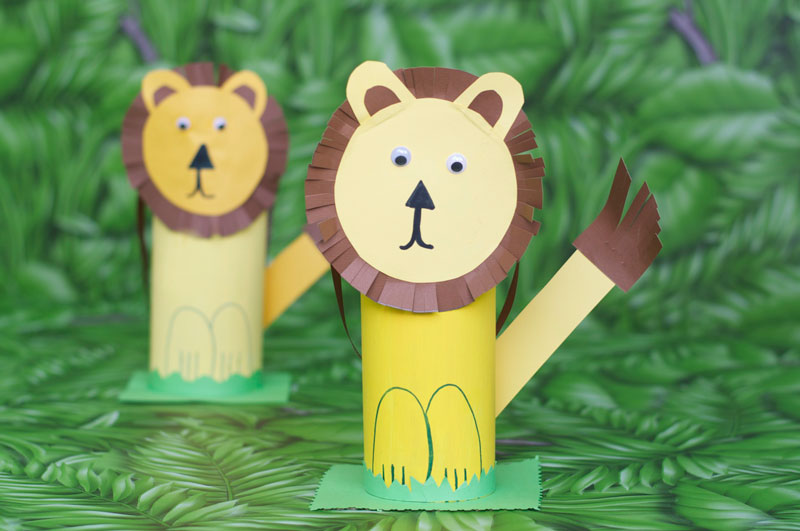
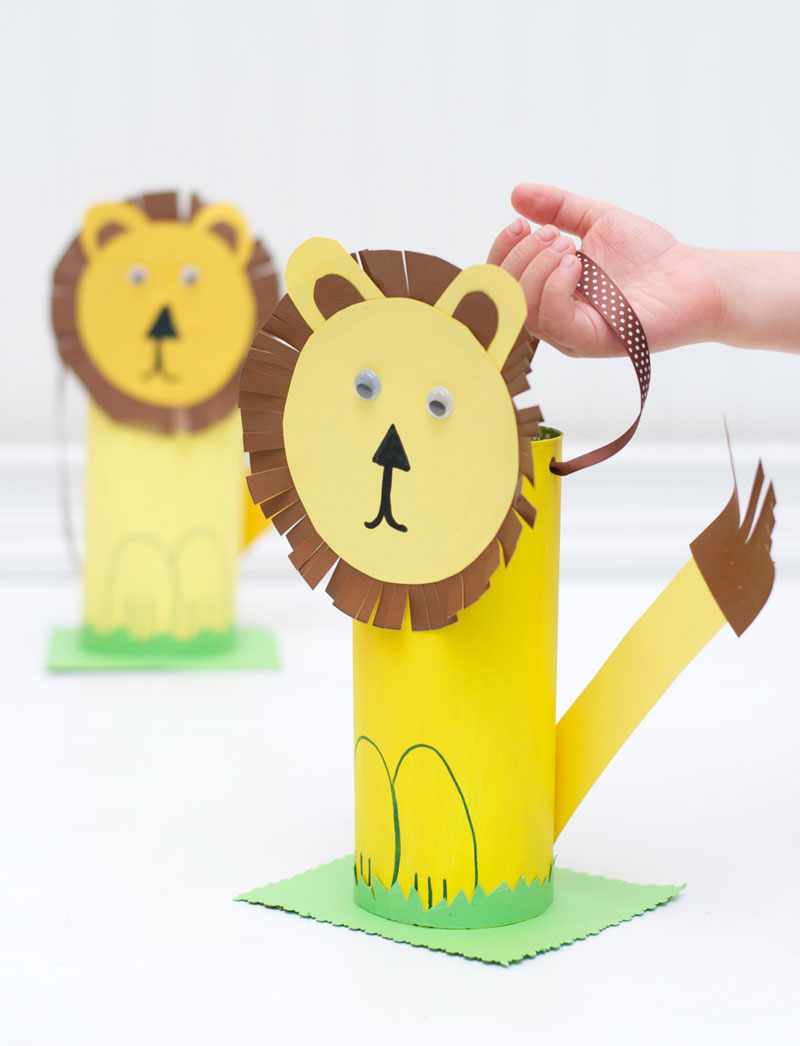
Lion Party Favor
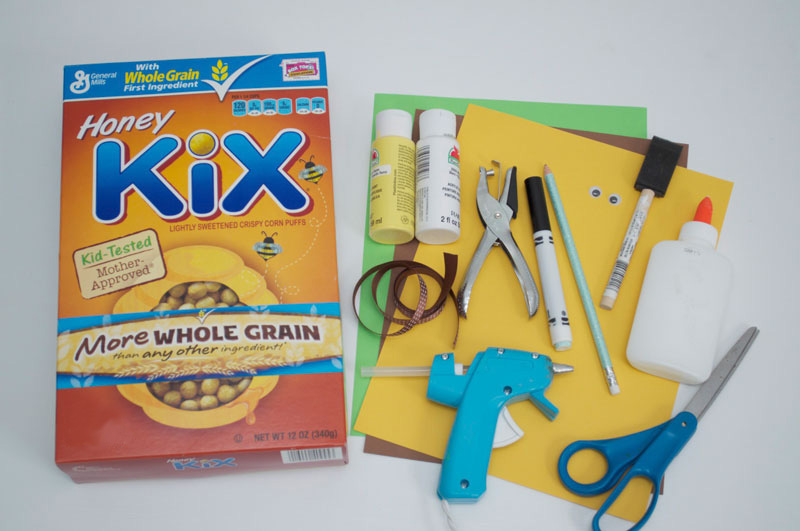
Materials
- Empty cereal box
- Yellow, brown and green cardstock
- Yellow and white paint
- Ribbon
- Googly eyes
- Hot glue
- Glue
- Scissors (age-appropriate or parental guidance)
- Black marker
- Hole punch
- Paint brush
Getting Started
With ALL my parties, I like to have a cute take home goodie bag the kids can make themselves. When they’re done, you can FILL it with sweet treats and party favors. For this craft, there is a little prep work that needs to be done BEFORE the party.
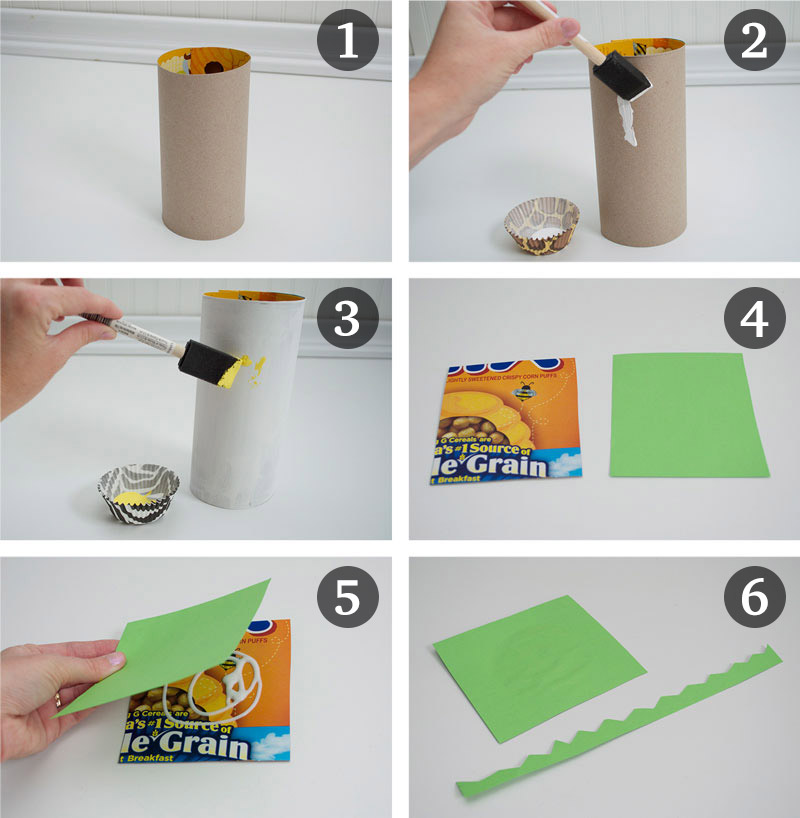
Step 1 – Create Lion Body and Grass
I cut out ONE side of an empty cereal box and folded it over and hot glued into place. I then added one coat of white paint and let dry 30 minutes (the kids can add the yellow paint at the party).
For the bottom of the lion, I wanted to create some grass. I cut a small square using the OTHER side of the cereal box and covered it with green cardstock.
Then, I used a strip of green cardstock and cut it into a zig-zag pattern (to add in step 3 to the bottom of my lion’s feet).
Step 2 – Create Lion Face and Tail
I traced AND cut out a large and small circle for the lion’s face. Use scissors to FRINGE the ends of the large circle for the lion’s mane. Then, use a black maker and draw on the lion’s nose and mouth. Finally, add your googly eyes.
Next, cut out the lion’s ears and glue the face TOGETHER (making sure to add your lion’s ears behind the face).
Lastly, cut out a THICK strip of the yellow cardstock for the lion’s tail and a small brown slanted square for the tail’s end. Make sure to FRINGE your lion’s tail and glue together!
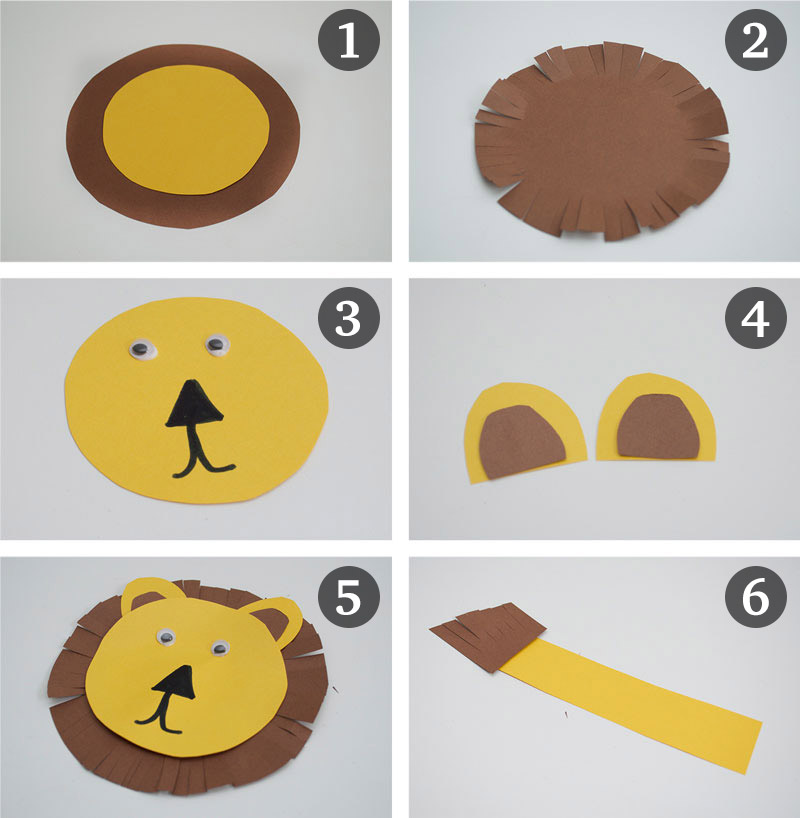
Step 3 – Glue Lion Pieces Together
Add glue to the BACK of your lion’s head and tail (use clothespins to keep in place).
WRAP your grass around the feet of the lion and glue into place. Add a layer of glue to the BOTTOM of the lion and firmly place on the grass square.
Let lion dry for 30 minutes. For faster results, you could hot glue your lion together.

Step 4 – Add Your Strap
Now it’s time to add your lion’s HANDLE!! Add some small holes to the TOP of the lion. Then, tie in a decorative ribbon for your handle.
FINALLY, fill with decorative paper shreds and goodies for the kids to take home!

Finished Cereal Box Lion Party Favor
Paper Plate Panda Mask

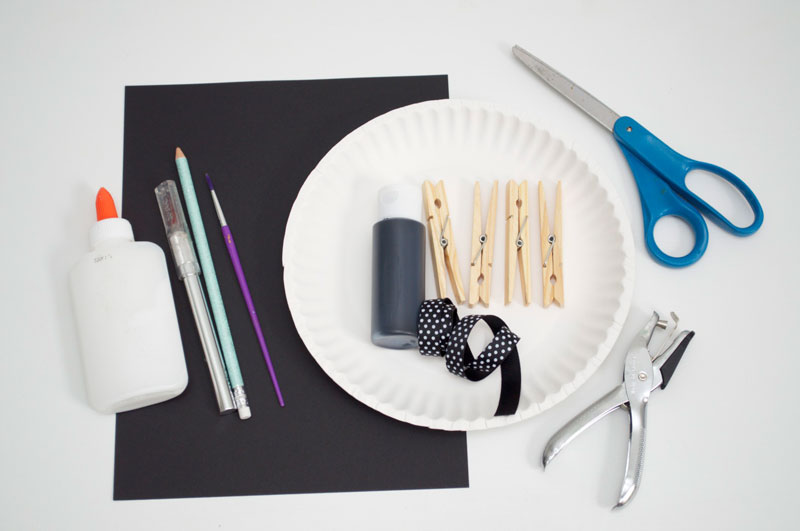
Materials
- Paper plate
- Black cardstock
- Back paint
- Ribbon
- Scissors (age-appropriate or parental guidance)
- X-Acto knife (parents only)
- Hole punch
- Clothespins
- Paint brush
- Pencil
Getting Started
I love the panda’s at the Zoo (they are just too adorable)! So…I HAD to add them to my Kix zoo party. PLUS, they are super easy and fun to make. At the end, the kids have a CUTE mask to take home and play with!!
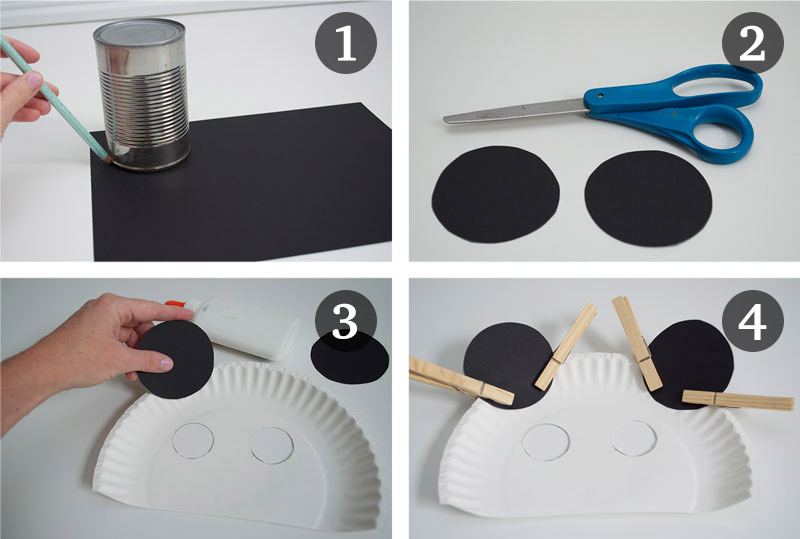
Step 1 – Trace and Cut Your Eyes
Cut your paper plate in HALF and trace out your eyes. I used my “Handy Dandy” X-Acto knife to CUT the eyes out. I would recommend doing this BEFORE the party for the kid safety.
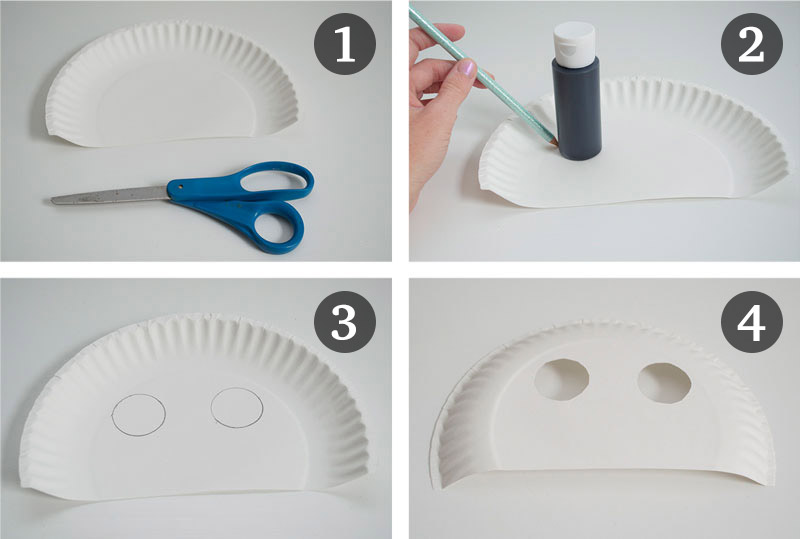
Step 2 – Cut and Add Your Ears
Trace out AND cut out your panda’s ears (I found that a can was the PERFECT size). Next, add some glue to the front of your paper plate and use clothespins to keep in place while drying.
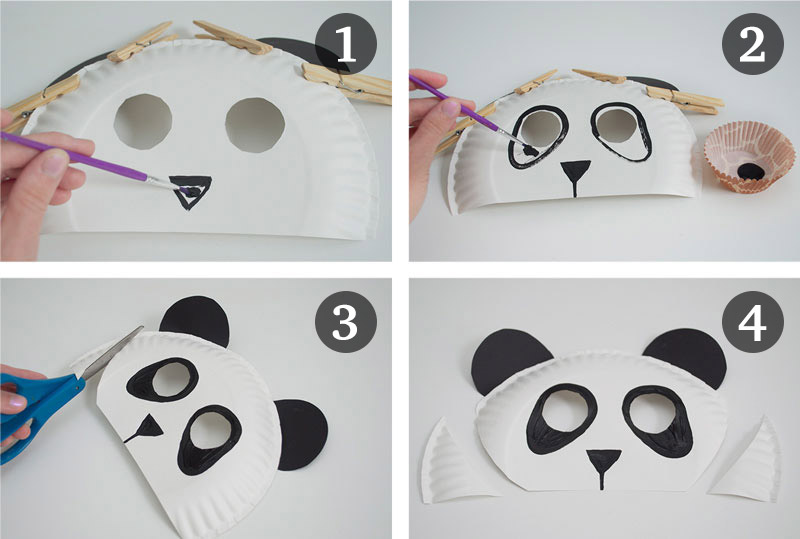
Step 3 – Paint and Cut Your Face
Have the kids paint their panda’s nose and eyes. Let dry 20 minutes.
Once the masks are DRY, cut out the corners of the mask to make a nice round face for your panda!!
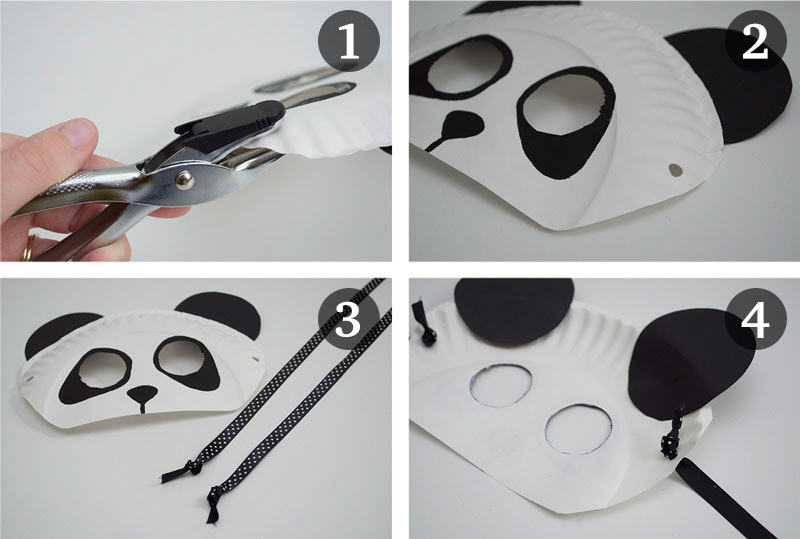
Step 4 – Add Your Ribbon
FINALLY, add a hole punch to each side of the mask and tie in a decorative ribbon (because I LOVE fancy ribbon).
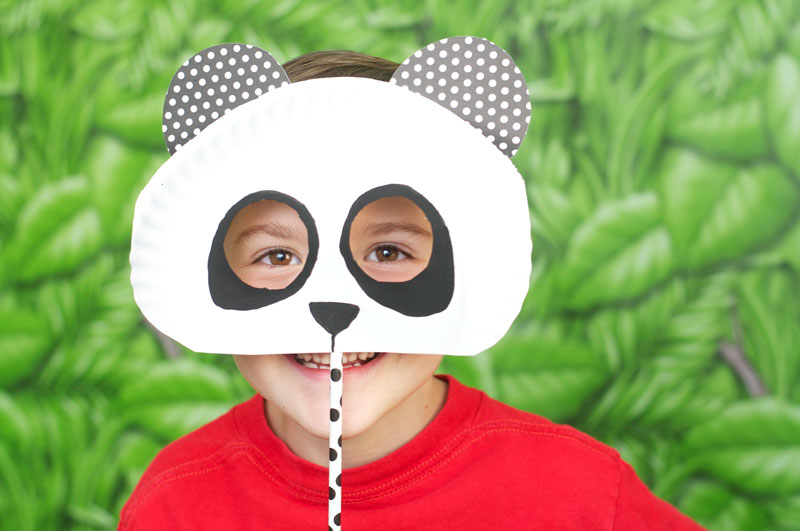
Finished Panda Mask
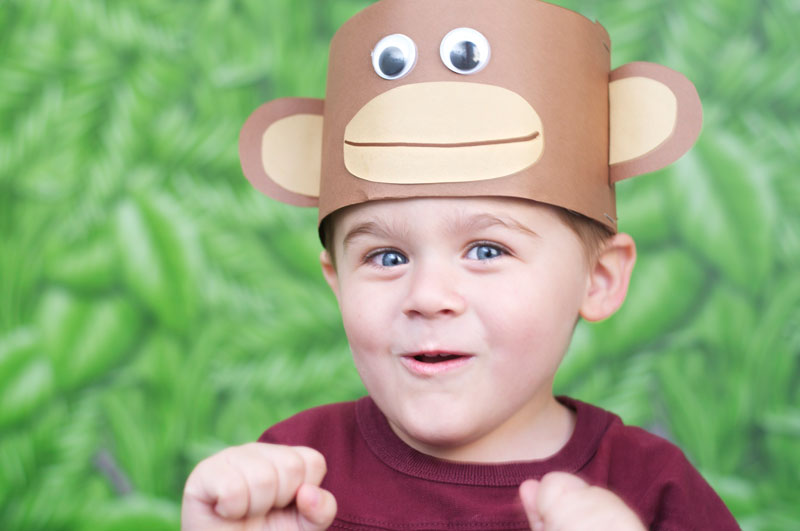
Paper Monkey Hat
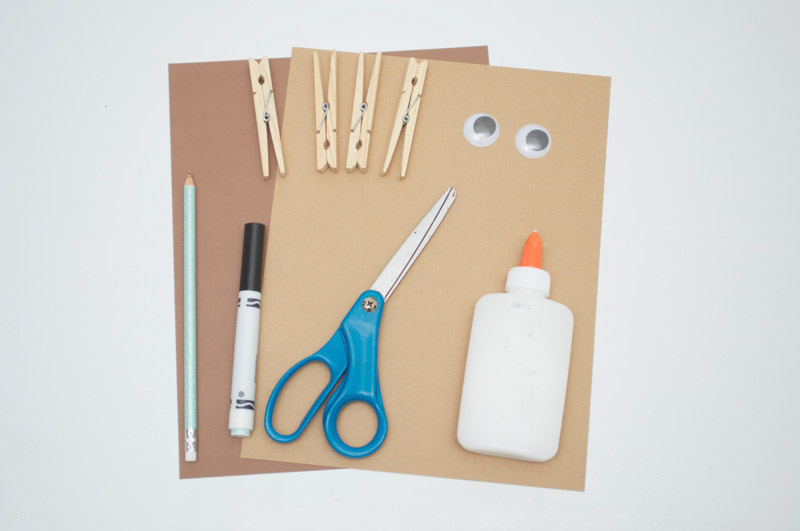
Materials
- Dark and light brown cardstock
- Large googly eyes
- Black marker
- Glue
- Clothespins
- Scissors
- Pencil
Getting Started
What kid DOESN’T want to see the monkeys at the Zoo?? I think they’re everyone’s favorite part. So of course, I HAD to have a monkey craft! Your kids will have fun jumping around pretending they’re little monkeys at the party!
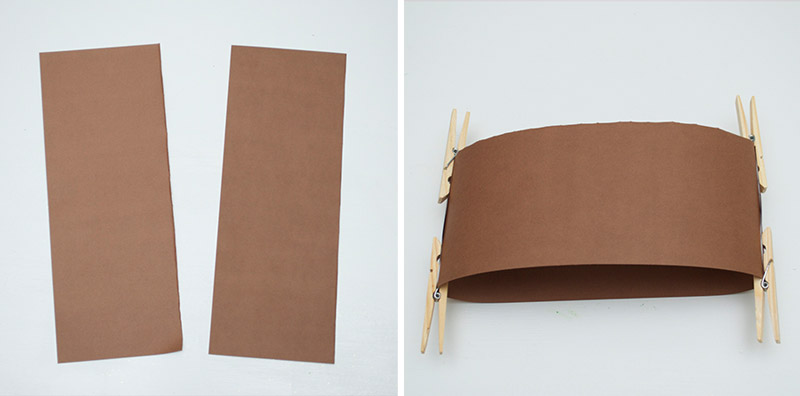
Step 1 – Create Your Monkey’s Head
Cut a REGULAR size piece of cardstock in half and glue both ends together. Secure in place with clothespins and let dry 15 minutes.
For a faster way to secure your monkey hat, you can STAPLE the ends together.
Step 2 – Create Your Mouth and Ears
Trace and cut out the shape for the monkey’s mouth. Have the kids draw on their monkey’s cute little grin!!
Cut out the monkey’s ears using a lighter and DARKER shade of cardstock. Bend the ends of the ears and add a layer of glue. Once again, use the clothespins to secure into place.
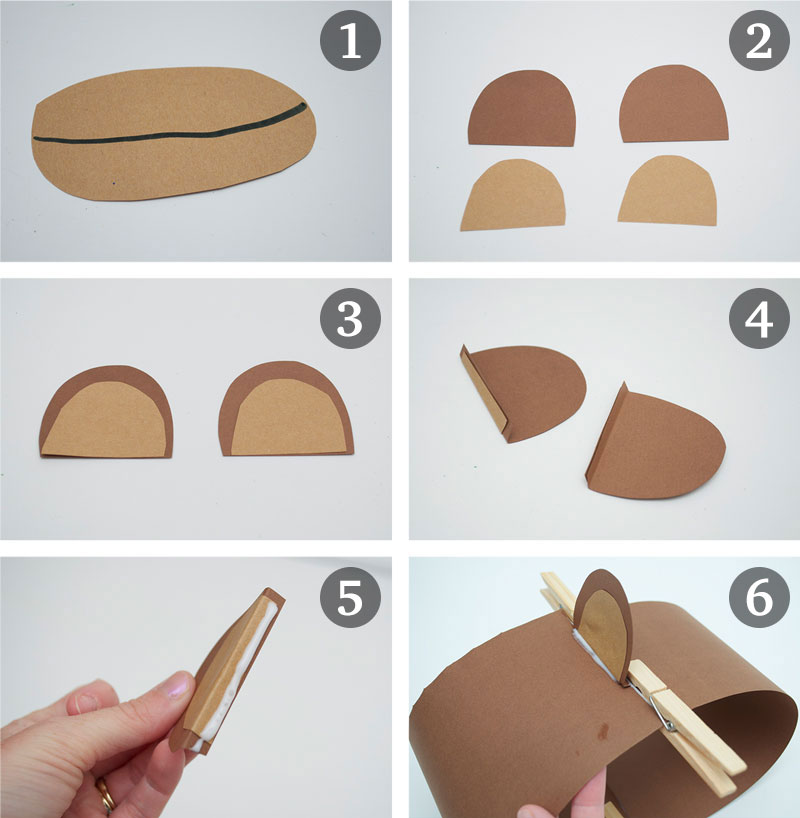
Step 3 – Add Your Monkey Face
To COMPLETE your monkey crown, just add the monkey’s eyes and mouth. Let dry 30 minutes.
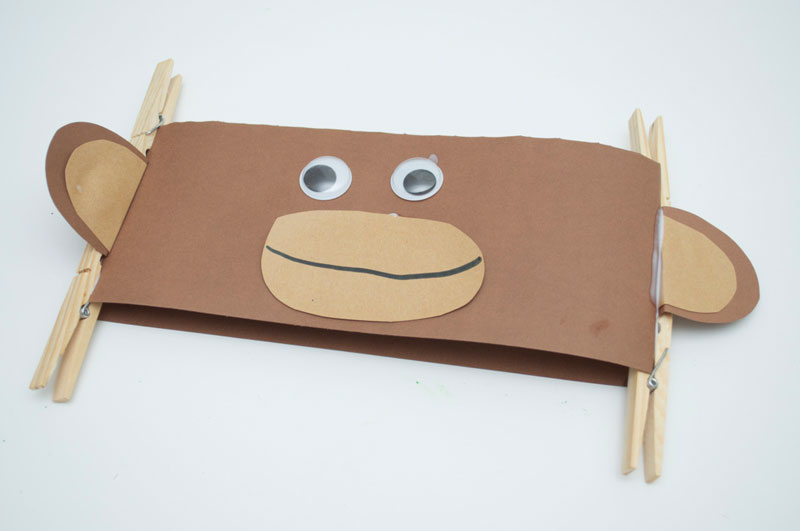
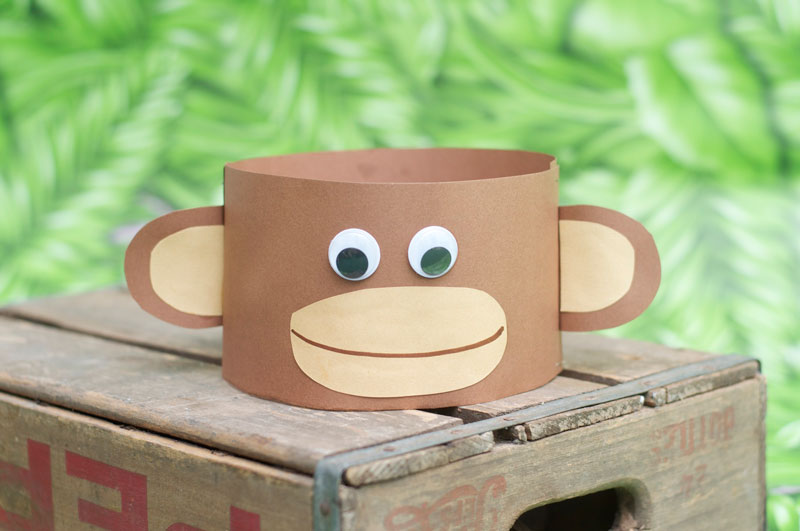
Finished Monkey Hat
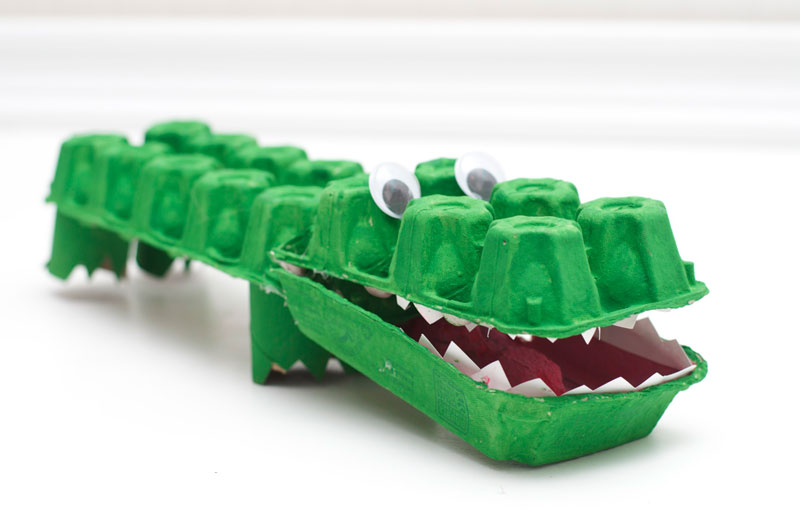
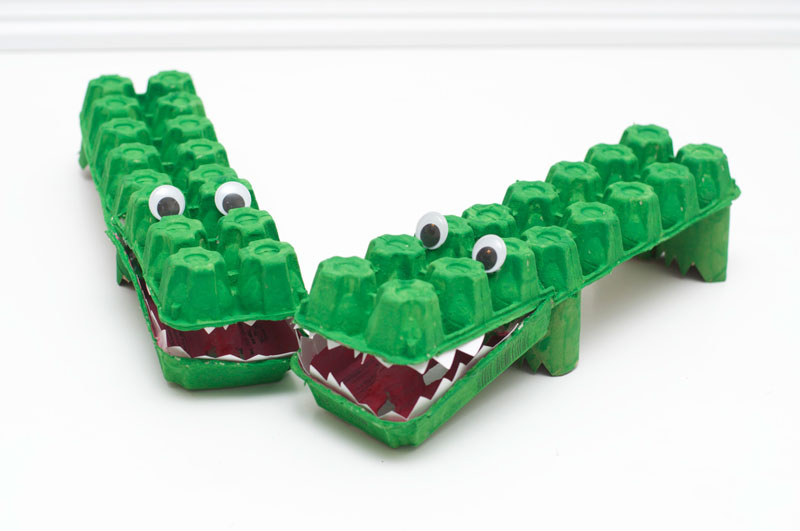
Egg Carton Alligator
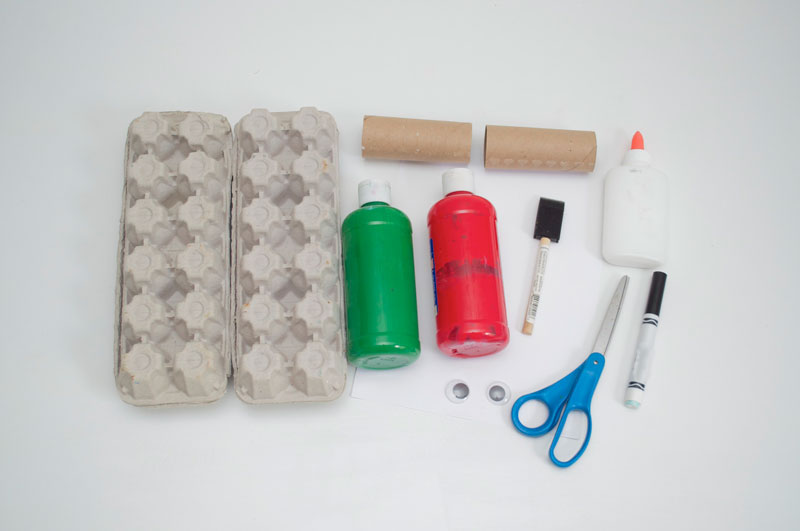
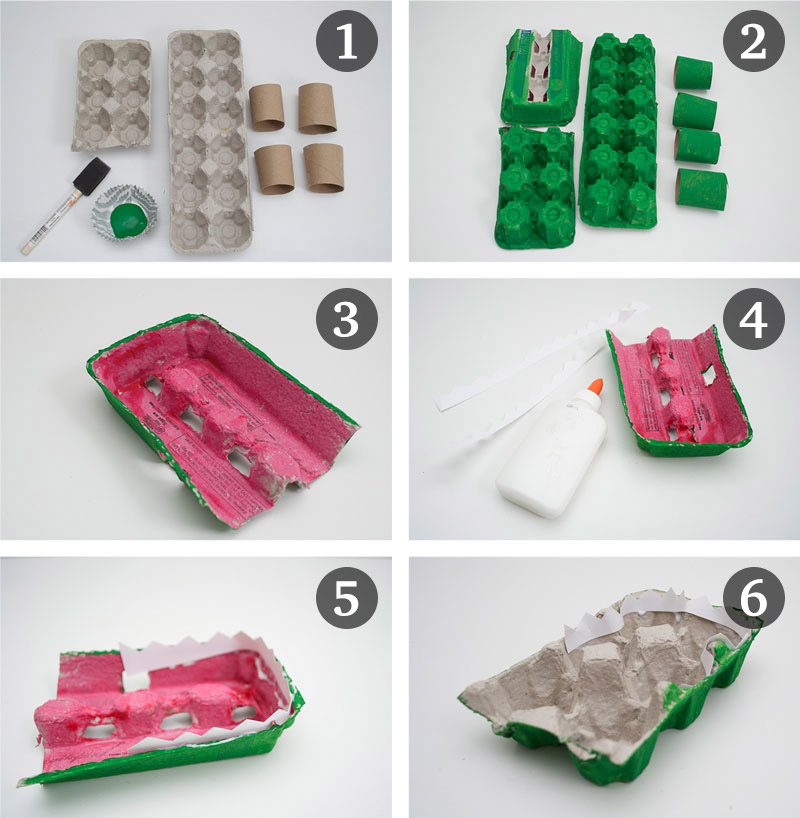
Materials
- 2 Egg cartons
- 2 Toilet paper rolls
- Green and red paint
- Large googly eyes
- Scissors
- Hot glue (parent’s only)
- Glue
- Paint brush
Getting Started
Personally, I love seeing the alligators at the Zoo, so I made sure to add my FAVORITE animal to this party!! This is a cute craft, but will need a parent’s assistance (putting the mouth together). I didn’t get a picture of the hot glue gun in the getting started picture.
Step 1 – Paint Alligator and Add Teeth
Cut off the BOTTOM of your first egg carton for the body. Next, cut the 2nd egg carton in half (and SEPARATE the top and bottom) for the gator’s mouth.
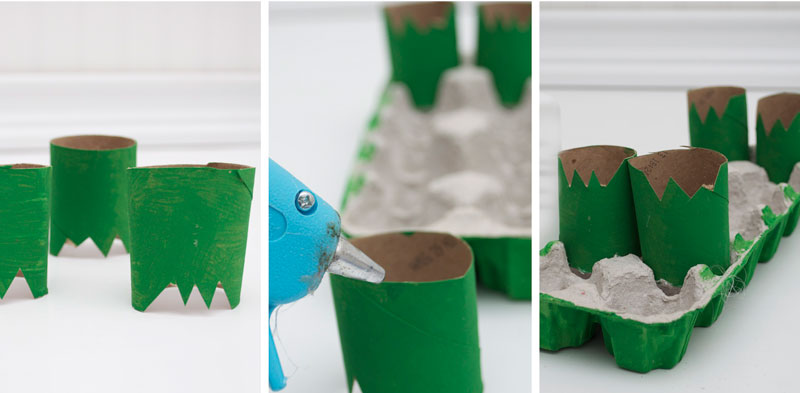
Then, cut both toilet paper rolls in HALF. Paint the OUTSIDES of the egg cartons and toilet paper rolls green. Let dry for 20 minutes.
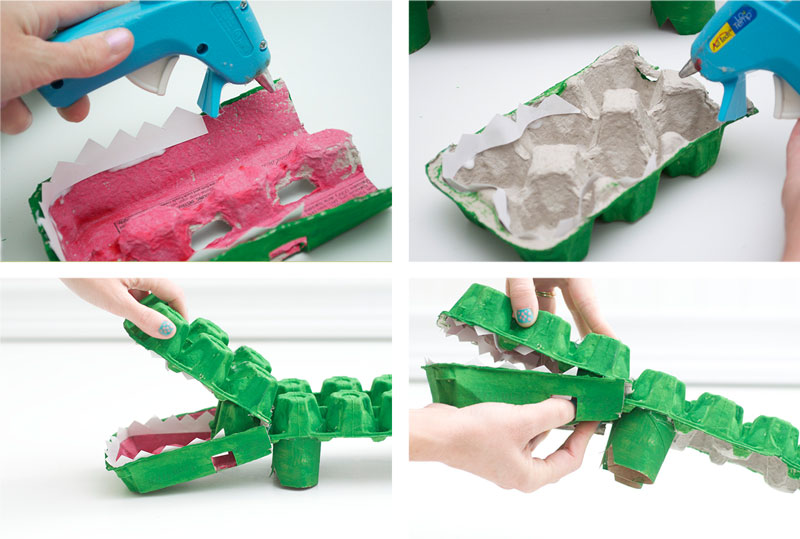
Once the mouth is DRY, paint the inside red. Finally, use a white piece of cardstock and cut into a ZIG-ZAG pattern for the alligator’s teeth. Glue into place.
Step 2 – Create and Add Alligators Legs
For the alligator’s FEET, cut out little triangles for the claws.
Now you are ready to start putting your alligator together!! This is the part a parent will need to assist.
Use the hot glue gun and add the feet.
Step 3 – Add Your Alligator Head
Add the bottom part of the mouth. Hot glue the BACK of the alligator’s mouth and firmly place underneath the chin.
NOW, add the TOP part of the alligator’s mouth by using a small amount of hot glue to the BACK of the alligator’s mouth with the OVERLAPPED egg cartons on top of the body.
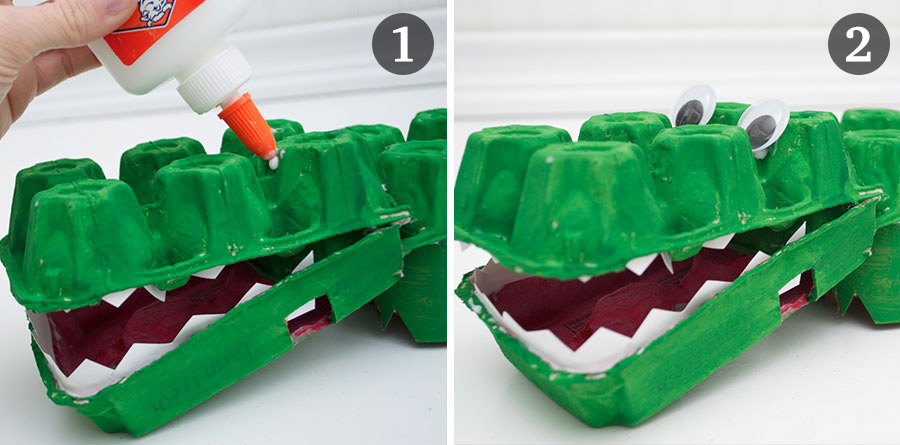
Step 4 – Add Your Alligator Eyes
Finally (to finish off our alligator), let’s add some really LARGE googly eyes with glue. Let dry for 15 minutes.
Finished Egg Carton Alligator
Working on this Zoo themed party was a WHOLE lot of fun. I hope I can provide some great inspiration for your next Zoo party adventure!


