4 Exciting and Fun Viking and Dragon Party Kids Crafts
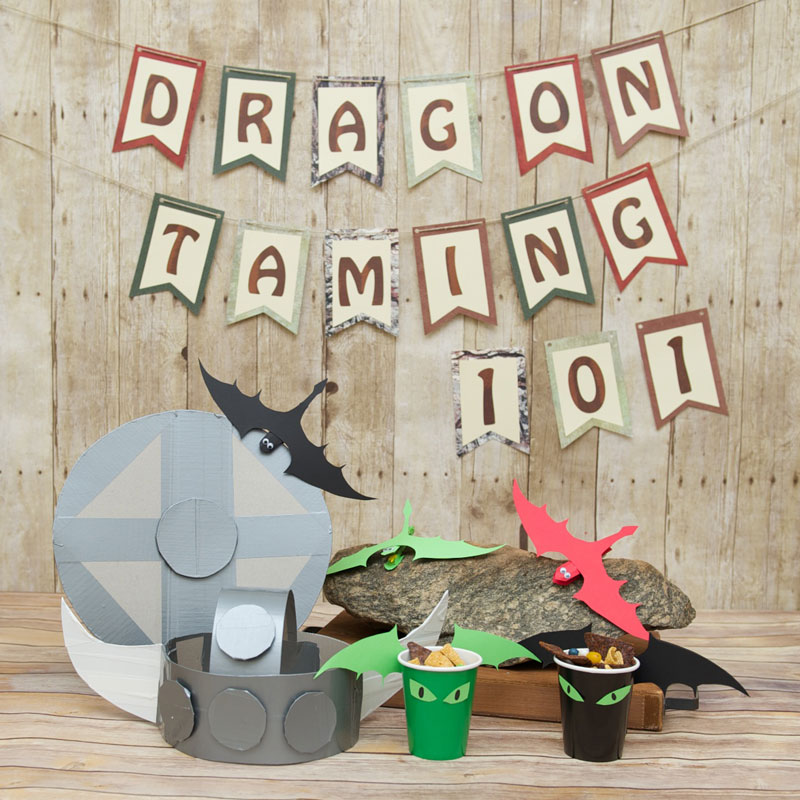
I was thrilled to get started on my next craft party! A dragon and Viking party, how cool is that? I’ve come up with some super cute and easy crafts you can make at your next party with the kids.
Plus, what kid doesn’t love making their own costume? They can pretend to be Vikings with a Viking shield and helmet made from cereal boxes. We even added a couple dragons to tame!
They’ll ROAR for these fun Viking and dragon crafts:
Now let the training (crafting) begin!
Cereal Box Viking Helmet
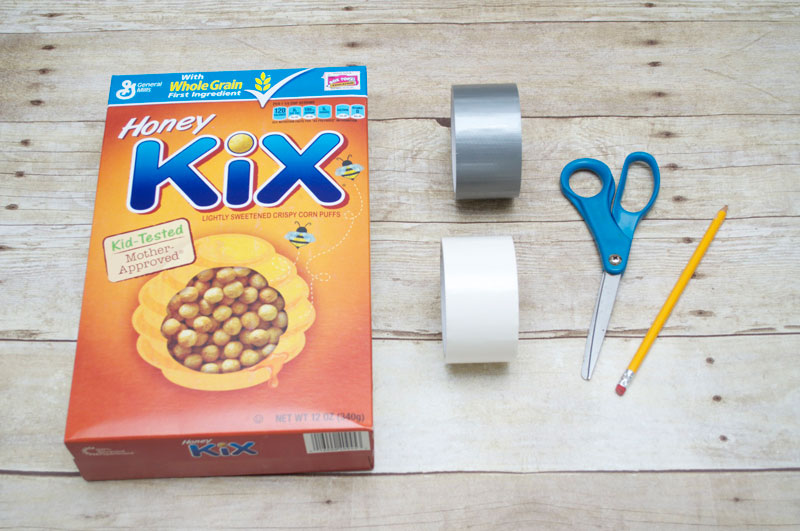
Materials
- Empty cereal box
- Gray duct tape
- White duct tape
- Scissors
- Pencil
Getting Started
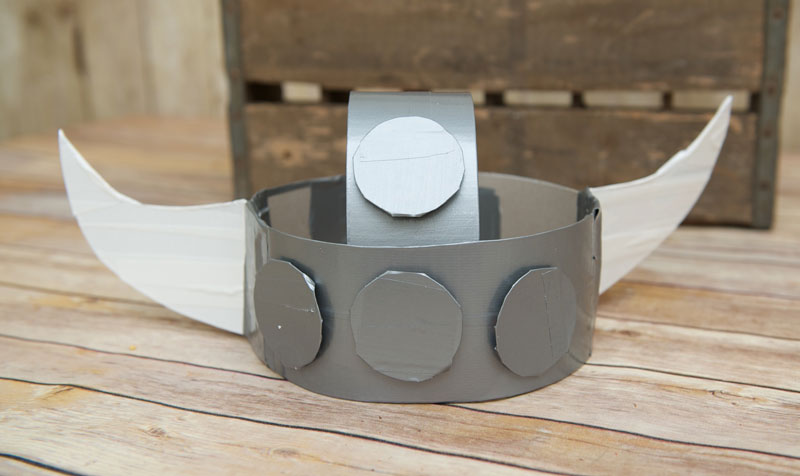
You can’t be a proper Viking without a Viking helmet, right? We decided to make our Viking helmet out of a cereal box and it worked out perfectly!
My favorite part about this craft…all you need is duct tape and you’re set.
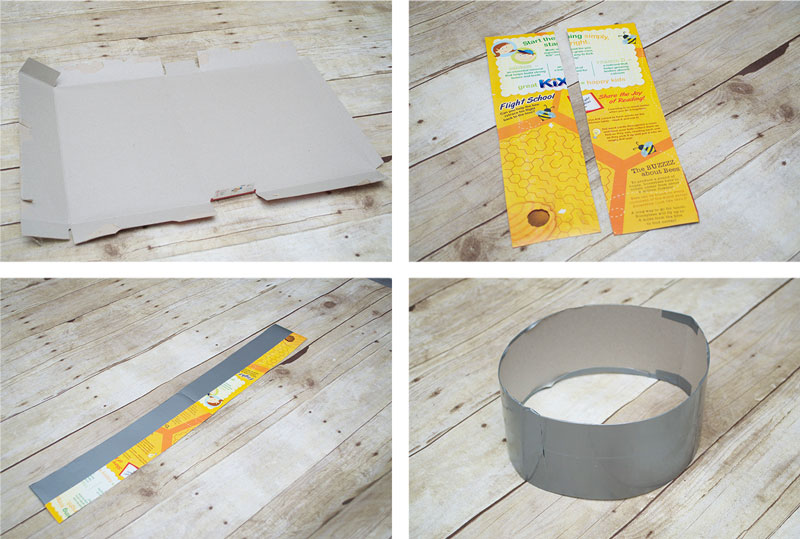
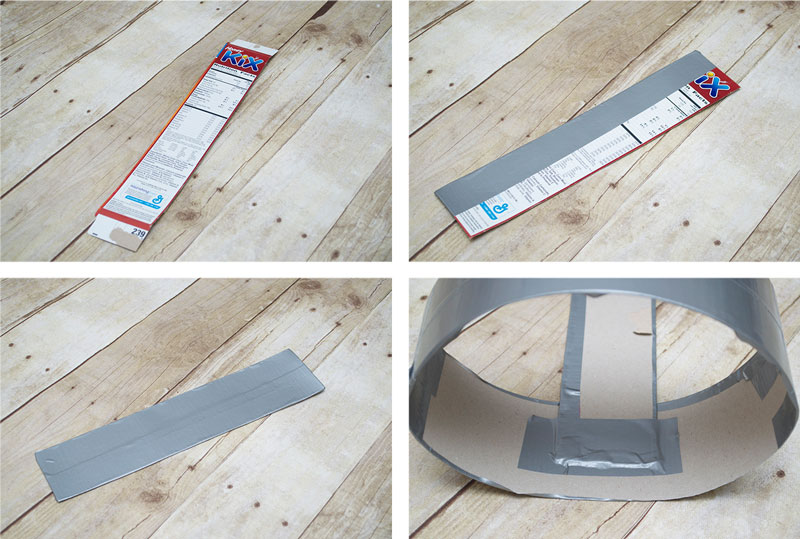
Step 1 – Create Helmet’s Lower Rim
Open your cereal box and cut out one side of the box. Then, cut the piece in two for the rim. Measure to the size you need for the child’s head.
Lay the box flat, and cover one side with gray duct tape. Once the rim is covered, fold it over and add a little more tape to the end to keep in place. Easy so far, right?
Step 2 – Create Helmet’s Upper Rim
Now it’s time to make the upper part of the helmet! We used the side of the cereal box and cut off the flaps. Then, we covered it with gray duct tape.
Fold over and tape one end down to the inside of the helmet. Finally, repeat the process on the other side.
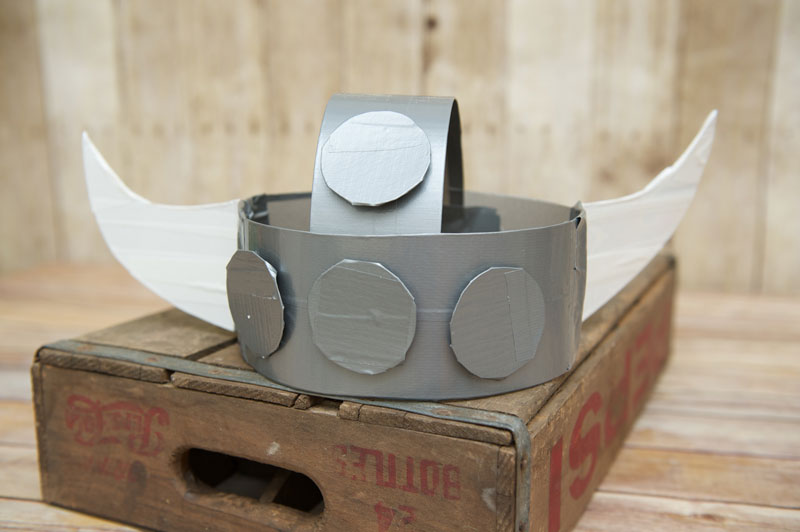
Step 3 – Add Your Horns
Now a Viking helmet wouldn’t be finished without horns, so…
Using the other side of the cereal box, I freehanded one horn and cut it out (making sure to use the side with the flaps on the cereal box). Then, laid it down and traced it out for the other side.
We covered each horn with two layers of white duct tape. Then (lining the flap along the side of the helmet), we went around with gray duct tape to keep in place.

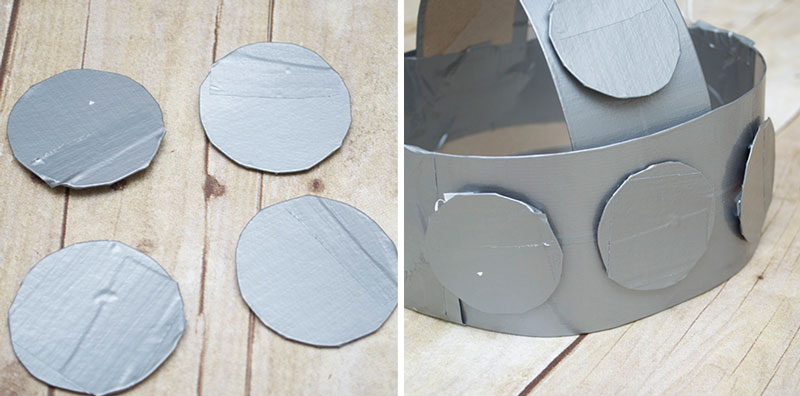
Step 4 – Add Large Studs to Helmet
It’s starting to look like a Viking helmet, but it just needs one more thing…studs of course!!
We traced out some circles, and covered them with more gray duct tape and taped them into place.
Finished Cereal Box Viking Helmet
Cereal Box Viking Shield
Materials
- Empty cereal box
- Gray duct tape
- Scissors
- Pencil
- String
Getting Started
Next on our list was a Viking shield. This was another great project using a cereal box. Our Vikings must protect themselves from dragons during training. Our shield does just that!

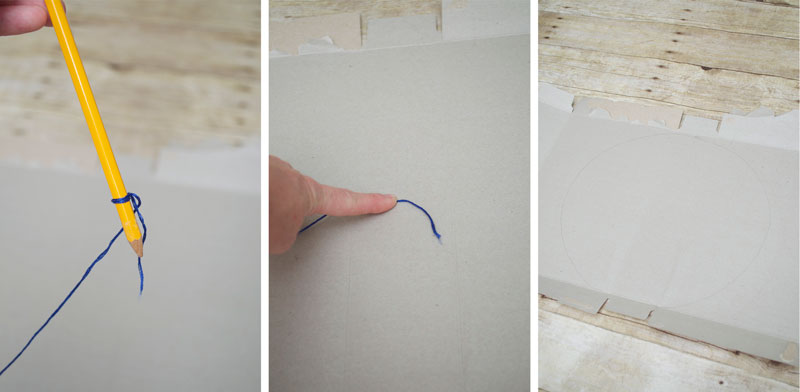
Step 1 – Draw a Large Circle on Cereal Box
Open your cereal box up and lay flat. I used a string to help make my circle for the shield.
Tie one piece of the string to a pencil or marker and hold the other end in place at the center of the cereal box. Measure out your string from the center of the box to the top to make a perfect circle. Go around to make your circle.
Now cut out your perfect circle!
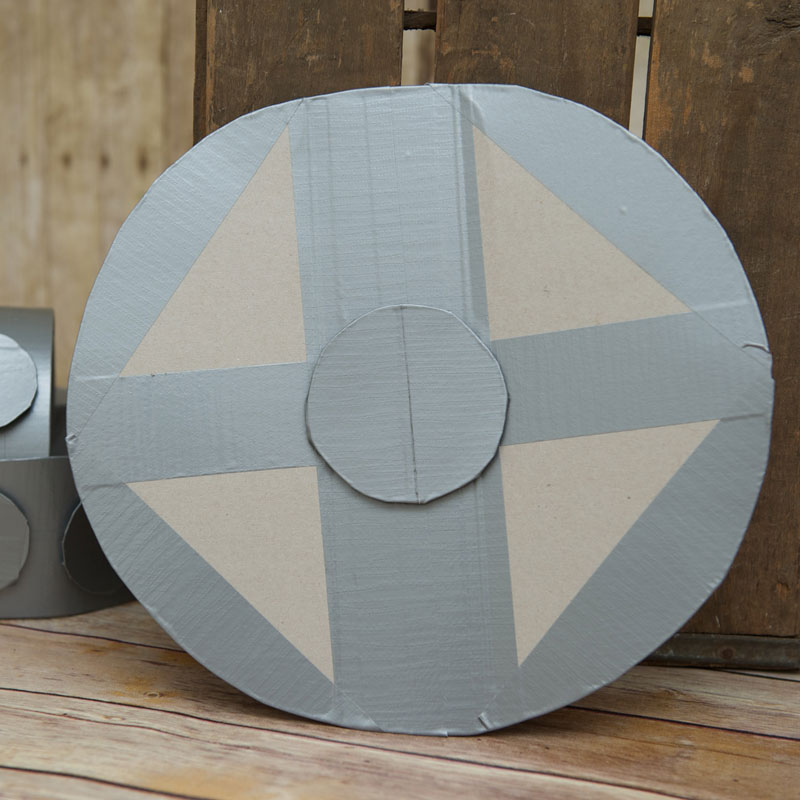
Step 2 – Add Shield’s Bands and Stud
Now let’s decorate our shield. I think any way the kids decorate their shield will turn out great! But, I really made sure to reinforce the center of the shield since that is where the crease was of the cereal box.
We traced out another circle for the center of the shield and covered with gray duct tape as well.
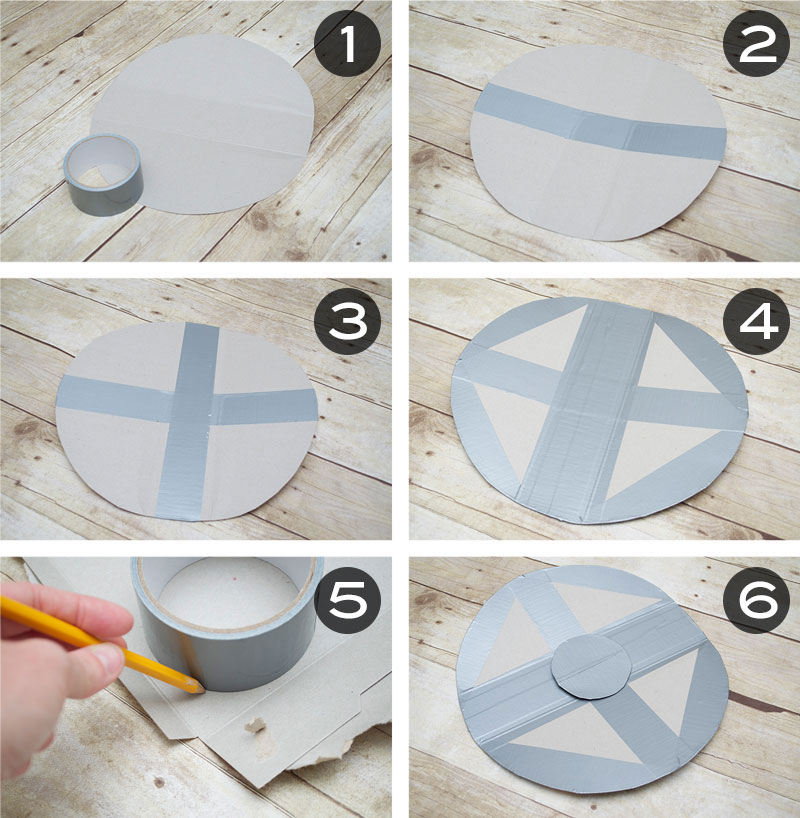
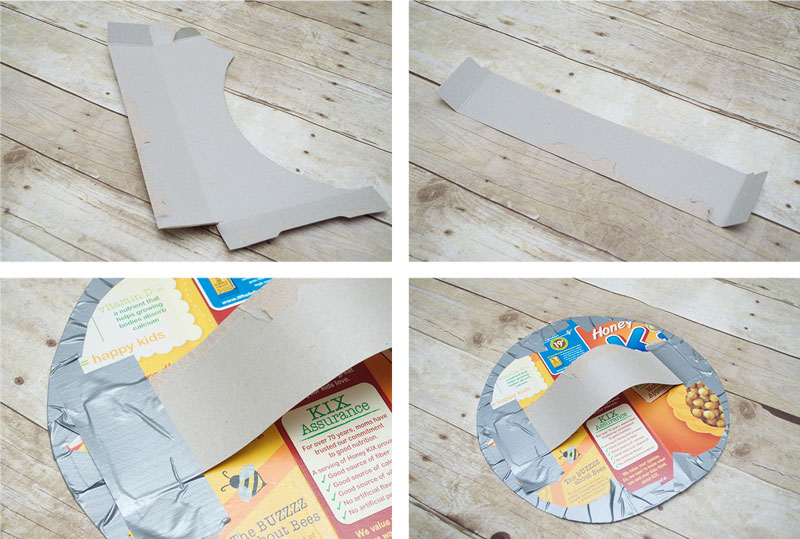
Step 3 – Add Your Shield’s Handle
Almost done: now we just need to add our handle.
Using the remaining side of the cereal box, we covered with our “handy dandy” gray duct tape. Finishing off with a little tape at both ends to keep the handle in place. Voila, all done!
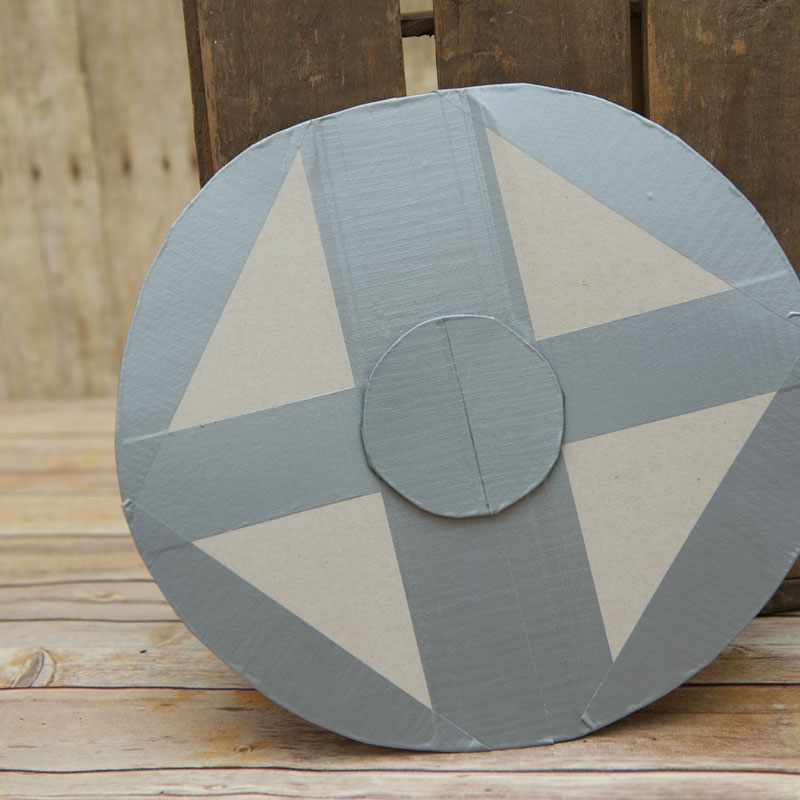
Finished Cereal Box Viking Shield
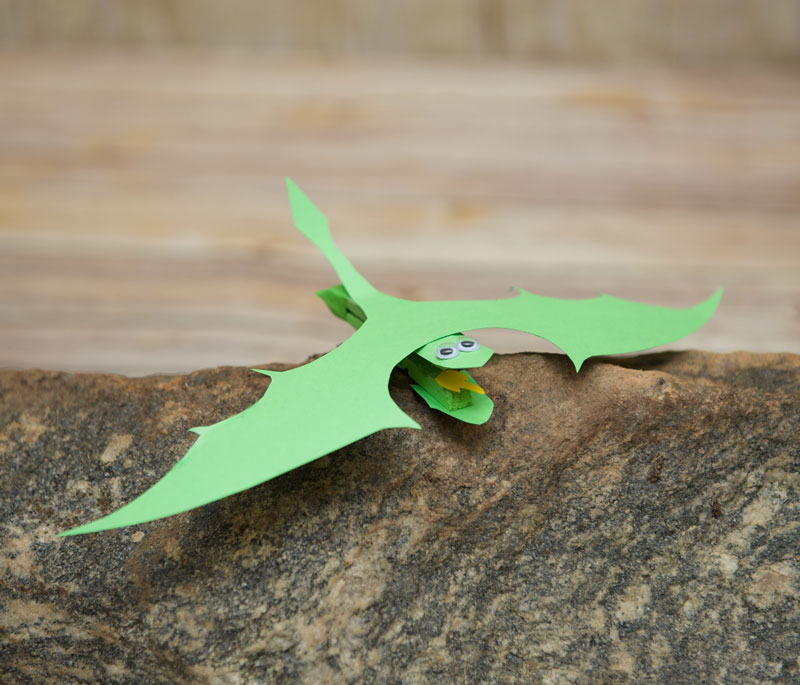
Clothespin Dragon
Materials
- Clothespin
- Dragon printable
- Cardstock
- Paint
- Paint brush
- Scissors
- Googly eyes
- Adhesive double sided tape
Getting Started
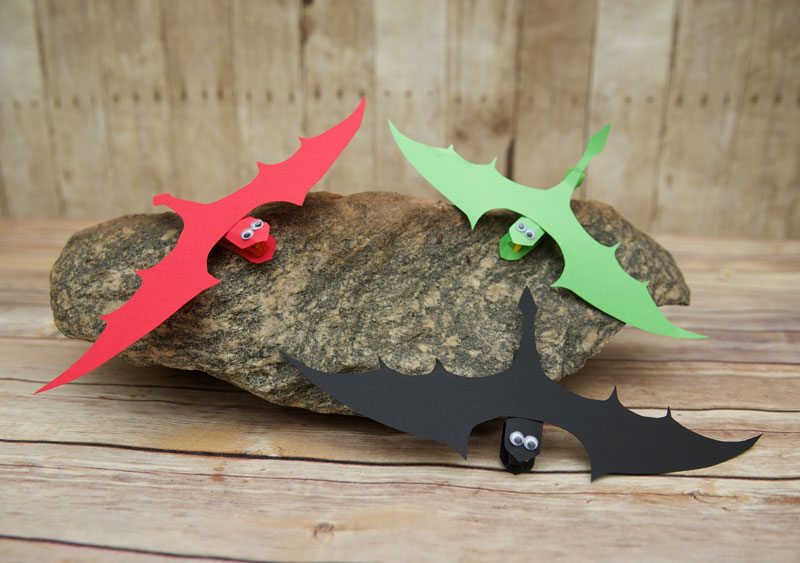
I wanted our dragon to be easy AND fun for the kids to make. So I came up with a simple printable for parents to use for our clothespin dragon. I think our fire-breathing dragons turned out great!
PLUS, the kids will have fun chasing each other with ’em and shooting fire!
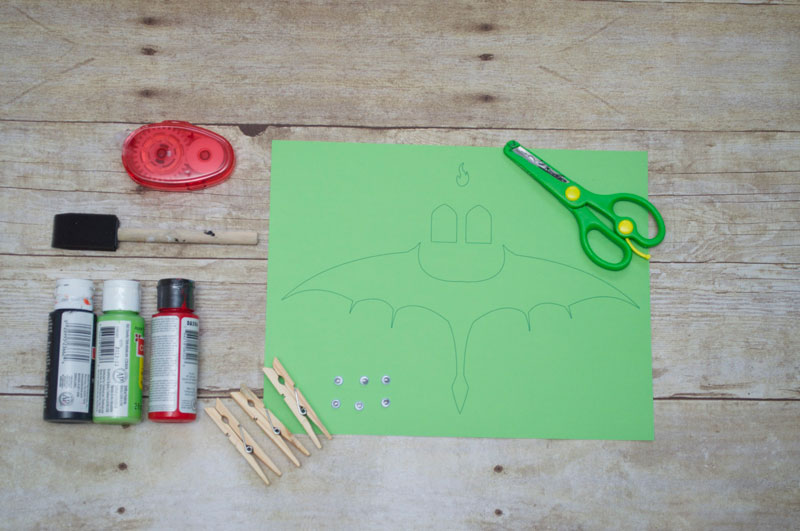
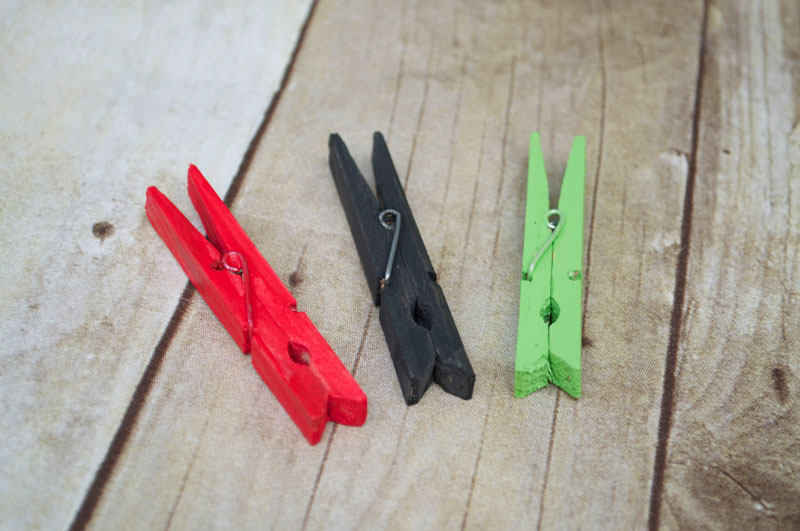
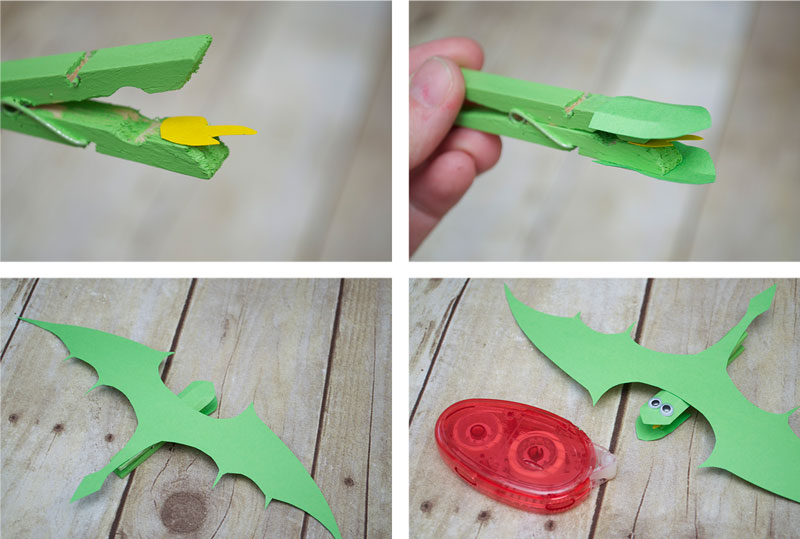
Step 1 – Paint Your Clothespins
Have the kids choose the color they want their dragon to be. Paint one coat over the ENTIRE clothespin. Let dry 15 minutes.
Step 2 – Cut Out Your Dragon Pieces
Print off your dragon in matching cardstock colors (to what the kids picked out). For our fire, cut the flame and the trace/cut it on orange or yellow cardstock.
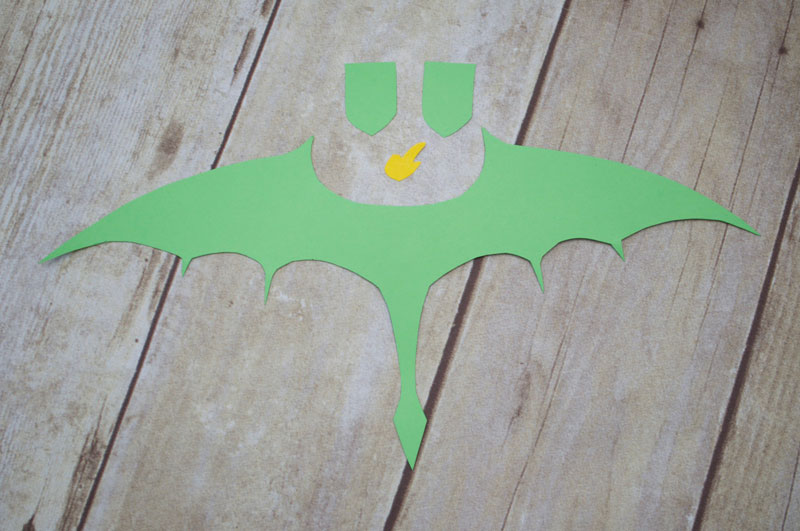
Step 3 – Tape Dragon Pieces to Clothespin
Using adhesive double-sided tape, place your fire in first. Then, add the top and bottom of the head (make sure to fold the sides over a little).
For our wings and tail, add more tape along the back of the clothespin and place the wings on TOP. Finish our dragon off, by adding googly eyes with double-sided tape!
Finished Clothespin Dragons
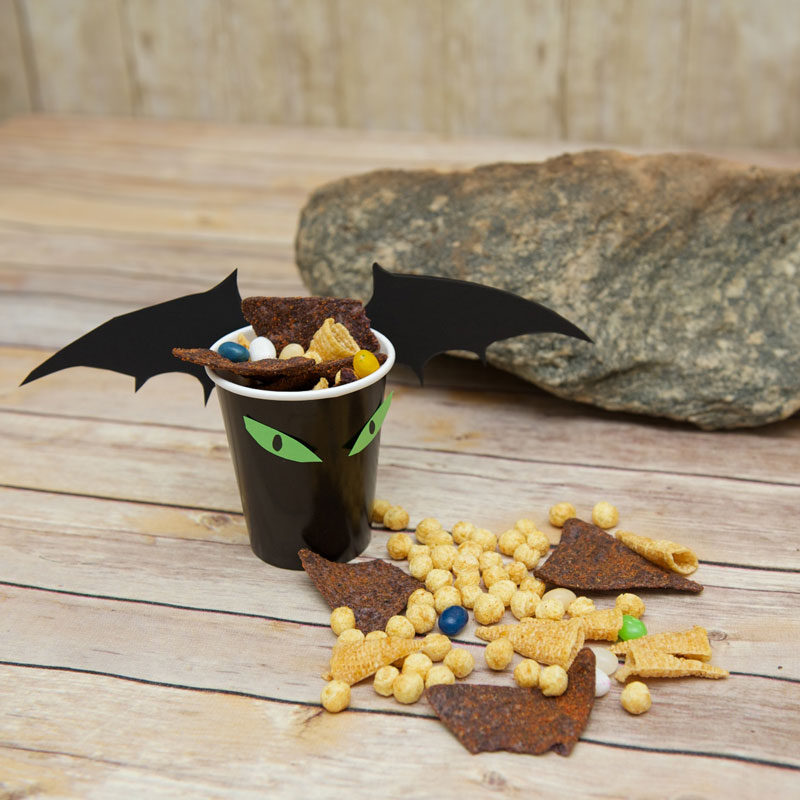
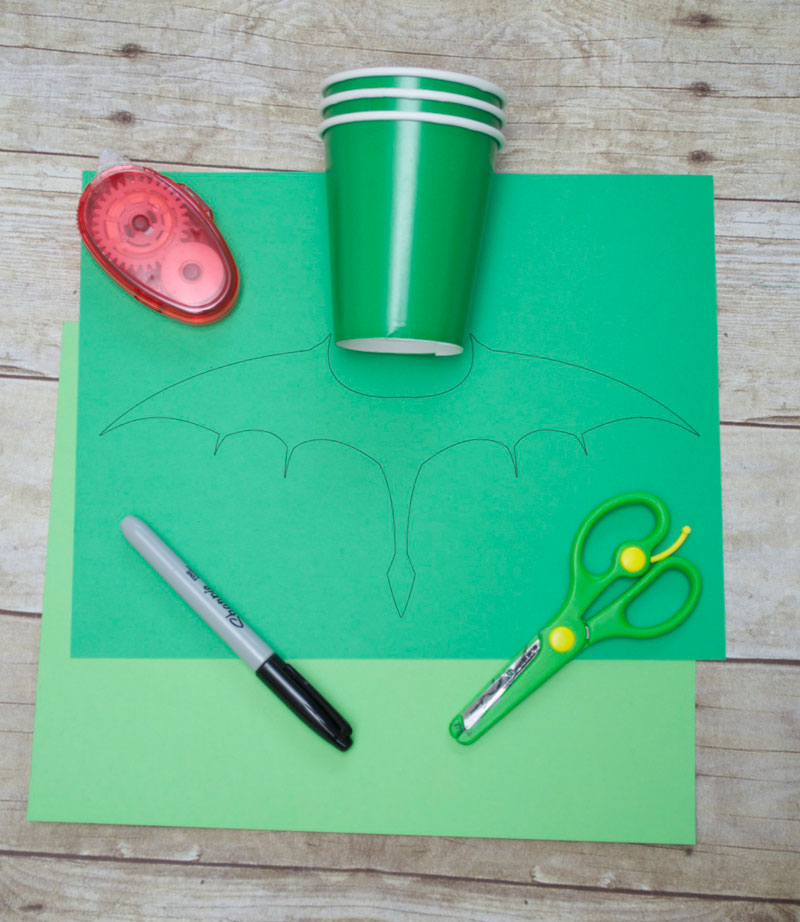
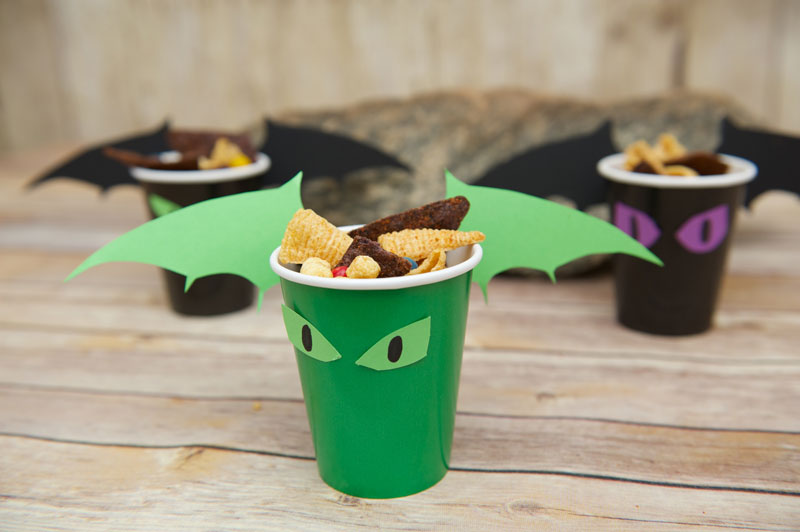
Dragon Snack Cup
Materials
- Paper cup
- Dragon printable
- 2 colors of cardstock
- Scissors
- Black permanent marker
- Adhesive double sided tape
Getting Started
Here’s ANOTHER craft where we were able to use the printable and have a completely new craft.
I also wanted to incorporate some Viking treats using Kix cereal and other goodies inside for the kids to snack on!
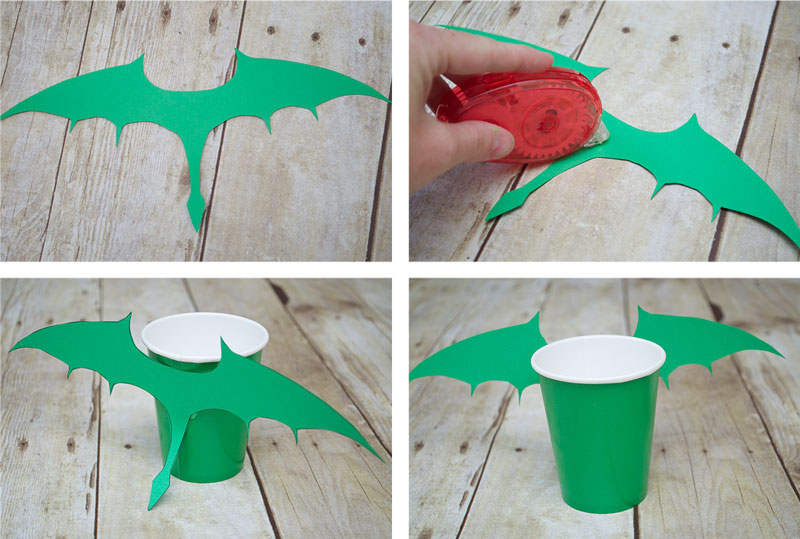
Step 1 – Cut and Tape Dragon Wings to Cup
Once you have dragon printed, ONLY cut out the dragon wings. Use the adhesive tape and place along the SEAM of the cup.
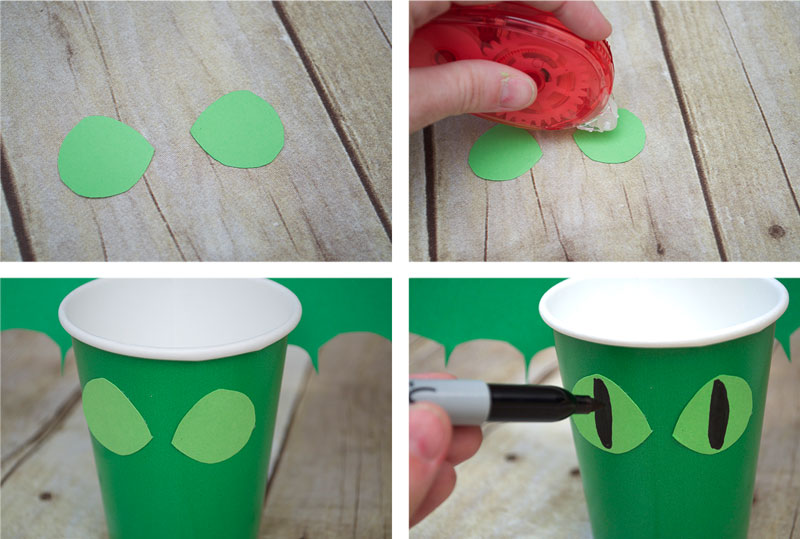
Step 2 – Cut and Add Eyes to Cup
Have the kids CUT out their dragon’s eyes. We folded our paper over and cut out our eyes. Once again, add some adhesive tape and place on the FRONT of the cup.
Use a black marker to finish your eyes.
Finished Dragon Snack Cups
Now your Vikings can have LOTS OF FUN with some pretend play and dragon training with their crafts.
As always, I had so much fun working on the crafts with the kids for the parties. It’s a GREAT way to add something different to your parties and fun crafts for your kids to take home.


